
NodeMaven Static Proxy Setup: Browser, cURL, and Python
NodeMaven static proxy setup: answer first
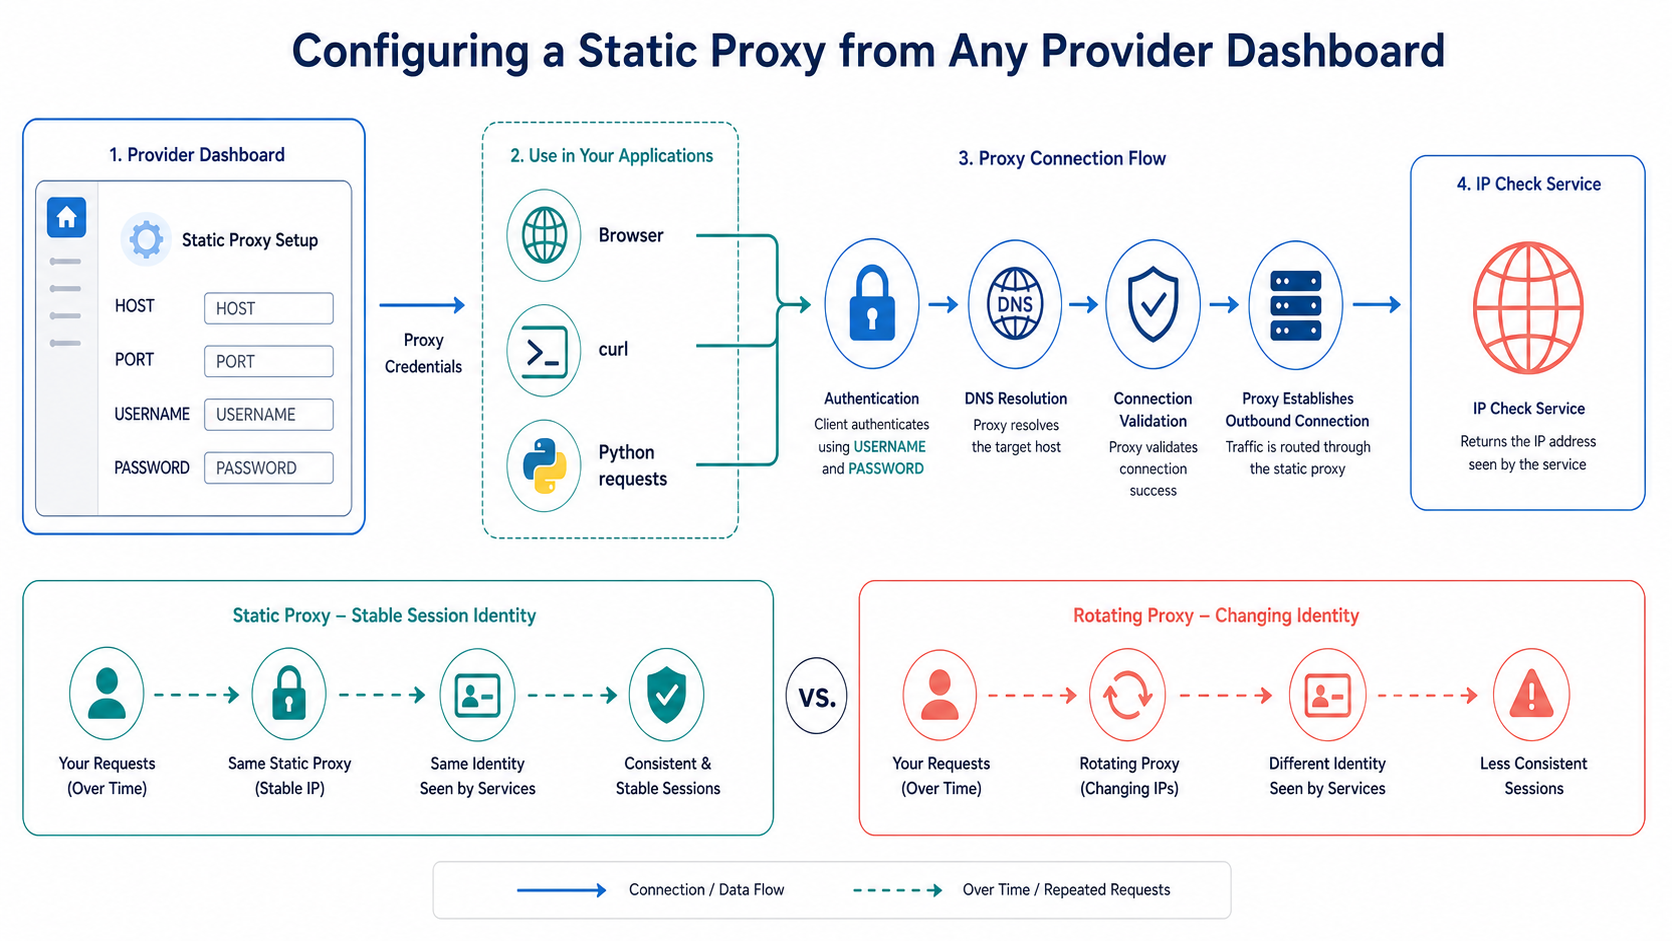
- Open the provider dashboard and select the intended static or sticky product.
- Copy the exact proxy scheme, host, port, username, password, and location or session fields.
- Store credentials in an environment variable or secret manager, not source code.
- Run one cURL test and confirm the returned public IP.
- Configure the browser or application only after the baseline succeeds.
- Repeat the IP check to confirm the documented session behavior.
The Requests proxy documentation shows how Python clients read proxy settings. If the server returns Proxy Authentication Required, use the MDN HTTP 407 reference to interpret HTTP 407 before rotating credentials or changing unrelated settings.
Static, sticky, and rotating are not interchangeable
| Session model | Expected behavior | Typical fit |
|---|---|---|
| Static endpoint | The documented endpoint maps to a stable address until the allocation changes | Allowlisting and long-lived application identity |
| Sticky session | A session token requests continuity for a bounded period | Authenticated workflows and multi-step tests |
| Rotating session | The provider may change the exit between independent requests | Authorized collection tasks without shared session state |
Confirm the exact semantics in the current dashboard. For alternatives, compare the residential proxy guide, SOCKS5 proxy behavior, and datacenter proxy infrastructure. The provider evaluation framework explains how to test documentation and session controls without relying on marketing labels.
Minimal cURL and Python tests
curl --proxy "http://HOST:PORT" --proxy-user "USERNAME:PASSWORD" --max-time 20 "https://example.com/ip-check"Replace every placeholder with the current dashboard value and use an approved IP-check endpoint. Avoid shell history for production secrets.
import os
import requests

proxy_url = os.environ["PROXY_URL"]
proxies = {"http": proxy_url, "https": proxy_url}

response = requests.get(
    "https://example.com/ip-check",
    proxies=proxies,
    timeout=20,
)
response.raise_for_status()
print(response.text)
Do not disable TLS verification to make a proxy error disappear. A standard CONNECT proxy should preserve end-to-end certificate validation. If the application requires browser automation, use the Playwright setup guide or Puppeteer comparison and configure the proxy when the browser context launches.
Troubleshoot by symptom
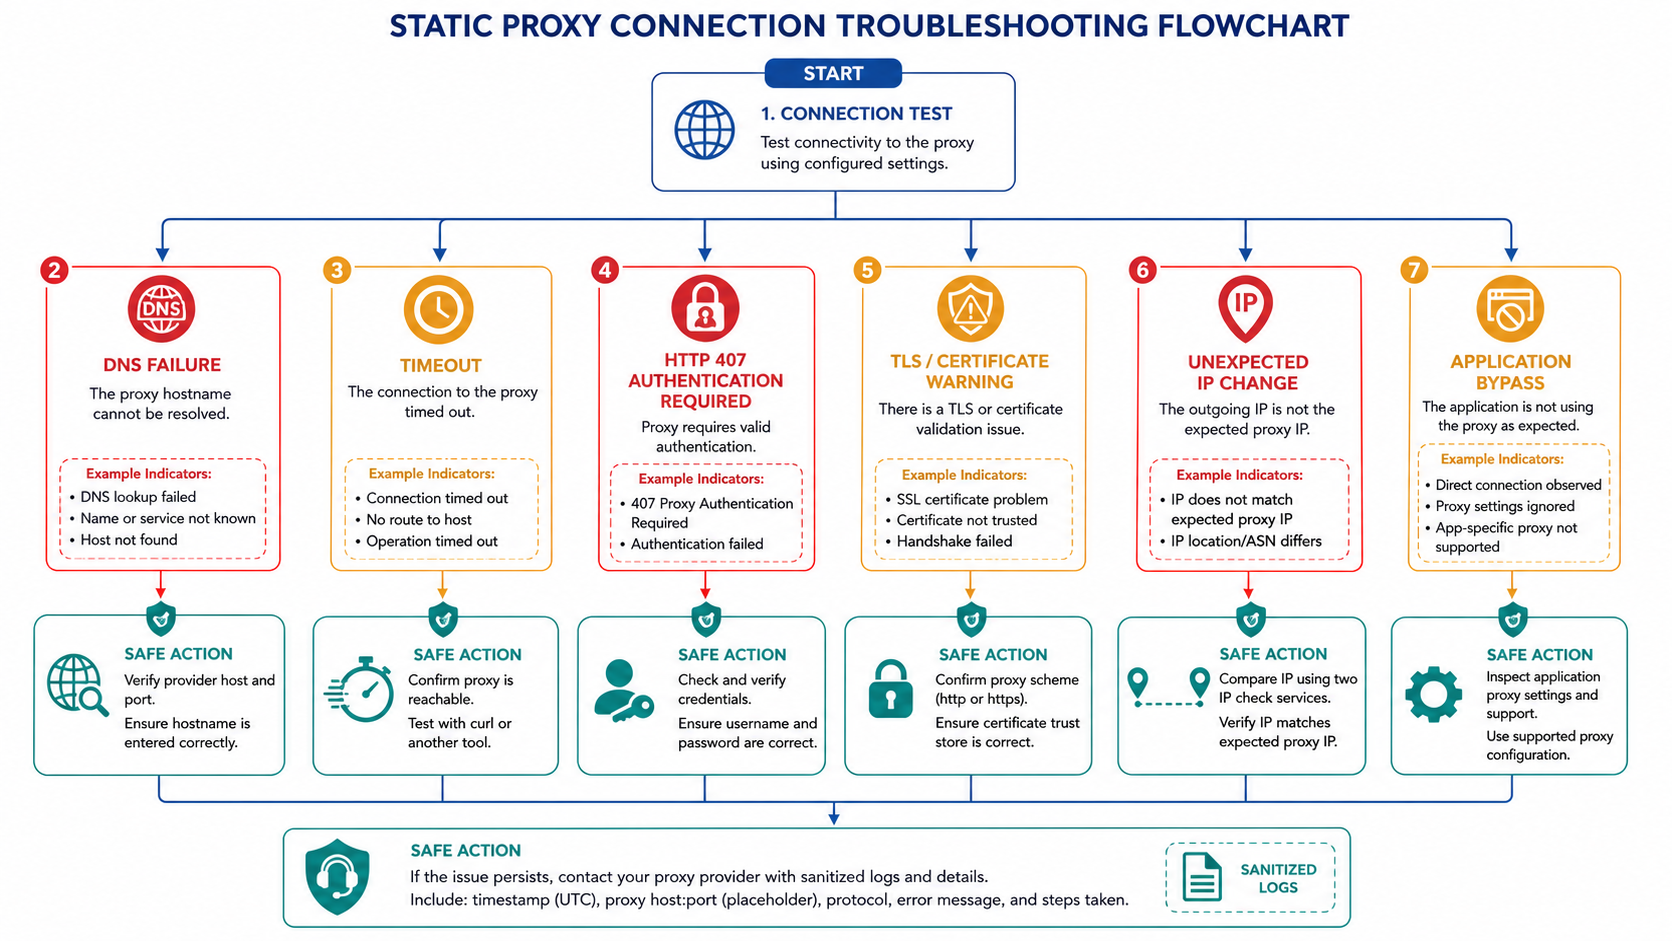
DNS failure
Resolve the proxy hostname from the machine running the client. Confirm spelling, local DNS policy, and whether the provider endpoint is reachable from that network.
Timeout or connection refused
Verify scheme, host, port, firewall, allowlist, account status, and regional egress rules. Test the same credentials from one supported client before changing the application.
HTTP 407
Check username and password, escaping of special characters, authentication mode, and IP allowlisting. A destination-site 401 is different from proxy 407.
Unexpected IP change
Confirm that the purchased product is truly static or that the sticky session token is preserved. Compare timestamps and sanitized request identifiers with the provider.
One application bypasses the proxy
Some clients ignore operating-system settings or proxy only HTTP. Use Proxifier application rules for supported desktop routing, the Android proxy guide for mobile scope, and Chrome proxy options for manual browser use.
Operational and security checklist
Keep credentials out of code and screenshots, rotate compromised secrets, use least-privilege allowlists, redact support logs, and document the authorized target and request rate. Stable routing does not grant permission to access a service. For browser QA, use fingerprint diagnostics to separate network context from browser state and the controlled validation workflow to change one variable at a time.
Bought proxies but can't get them working? You're not alone.
Thousands of developers, QA engineers, and data analysts purchase static proxies every month only to stare at error messages, timeout warnings, and failed connections. The frustration of paying for a service that won't cooperate is real, but the problem usually isn't the proxies themselves—it's the configuration.
Whether you are performing geo-localized quality assurance, validating security protocols, or gathering public data for market research, having is critical. This complete guide walks you through every step, from purchasing Nodemaven static proxies to implementing them correctly and responsibly in your scripts, automation tools, or privacy applications.
Why Static Proxies Fail (And How to Prevent It)
Before diving into the setup process, it helps to understand the mechanics of proxy routing. Approximately 90% of proxy failures stem from three highly preventable misconfigurations:
- Incorrect Authentication Format: Using the wrong username/password structure or failing to update your IP whitelisting configuration when your local IP changes.
- Protocol Mismatch: Attempting to use an HTTP proxy where a SOCKS5 protocol is explicitly required by the client (or vice versa).
- Software-Specific Syntax Errors: Overlooking the fact that every library and tool (e.g., Python Requests, cURL, Selenium) parses proxy strings differently.
Nodemaven's static proxies are datacenter IPs that remain constant. Unlike rotating networks that assign a new IP with each request, static IPs provide a reliable, dedicated connection tunnel. This makes them ideal for maintaining session persistence during localized testing or managing secure accounts where IP volatility triggers security alerts.
Act 1: Account Creation and Purchasing Process
Creating Your Nodemaven Account
- Navigate to Nodemaven's official website and click Sign Up.
- Enter your email address and create a strong, secure password.
- Verify your email through the confirmation link sent to your inbox.
- Complete your profile with billing information (most major credit cards, PayPal, and standard cryptocurrencies are accepted in 2026).
Choosing the Right Proxy Package
Nodemaven offers several static proxy tiers tailored to different technical requirements:
- Private Dedicated Proxies: Exclusive use with the highest speed allocation. Best for secure account management and highly sensitive QA environments.
- Shared Proxies: A cost-effective solution shared among 3-5 users. Suitable for general geo-browsing and lightweight, non-intensive public data collection.
- Premium Static IPs: Enhanced reliability featuring a 99.9% uptime guarantee and higher bandwidth caps.
When configuring your infrastructure, ensure you are selecting high-performance (not residential or rotating) to guarantee the static nature of your connection.
Selecting Location and Quantity
- From your dashboard, click Purchase Proxies.
- Select Static/Datacenter Proxies.
- Choose your target geographical location (e.g., US, UK, Canada) based on your testing or data locality needs.
- Select a quantity based on your project requirements (the minimum batch is usually 5-10 proxies).
- Choose a billing cycle (monthly subscriptions generally offer the most stable value).
- Complete the payment. Activation is typically instant but can take up to 15 minutes.
Retrieving Your Proxy Credentials
Once your package is activated:
- Navigate to Dashboard → My Proxies.
- You will see a deployment list detailing:IP Address: The static IP (e.g., 192.168.1.100)Port: Usually 8080, 3128, or a custom port assignmentUsername / Password: Your unique authentication credentialsExpiration Date: When your subscription requires renewal
- Download your proxy list in your preferred format (TXT, CSV, or raw JSON).
Act 2: Configuration Settings for Different Use Cases
This is the critical phase where most implementation errors occur. Proper configuration syntax depends entirely on the runtime environment or application you are utilizing.
Authentication Methods: IP Whitelisting vs. Username/Password
Nodemaven supports two distinct authentication approaches. Choose the one that best fits your infrastructure:
1. IP Authentication (Whitelisting)
- How it works: Add your server's public IP address to Nodemaven's whitelist via the dashboard.
- Syntax Format: 192.168.1.100:8080 (No credentials needed in the string).
- Pros: Cleaner code; simpler integration for legacy tools.
- Cons: Breaks immediately if your origin IP changes (highly problematic for local development on residential ISPs).
2. Username/Password Authentication
- How it works: Passes credentials directly in the request header.
- Syntax Format: username:password@192.168.1.100:8080
- Pros: Works seamlessly from any location, perfect for distributed teams or cloud functions.
- Cons: Requires precise string formatting to avoid parsing errors.
Configuring Proxies in Web Browsers
Chrome/Edge (via Proxy SwitchyOmega Extension):
- Install the SwitchyOmega extension from the Chrome Web Store.
- Create a new profile → Proxy Profile.
- Protocol: Select HTTP, HTTPS, or SOCKS5 (verify your purchased type in the Nodemaven dashboard).
- Server: Enter the IP address (e.g., 192.168.1.100).
- Port: Enter the port number (e.g., 8080).
- Under Authentication, click the lock icon to enter your username and password.
- Save and apply the profile.
Firefox (Native Settings):
- Navigate to Settings → Network Settings → Manual proxy configuration.
- Enter your IP and Port in the HTTP or SOCKS fields accordingly.
- Note: Firefox does not support native username/password proxy authentication prompting in all scenarios. If using authenticated proxies, utilizing an extension like FoxyProxy is highly recommended.
Python/Requests Configuration
For programmatic requests using Python's standard requests library:
Python
import requests

# With username/password authentication
proxies = {
    'http': 'http://username:password@192.168.1.100:8080',
    'https': 'http://username:password@192.168.1.100:8080'
}

# With IP whitelisting (no auth needed)
# proxies = {
#     'http': 'http://192.168.1.100:8080',
#     'https': 'http://192.168.1.100:8080'
# }

# Make the request
response = requests.get('http://ipinfo.io/json', proxies=proxies)
print(response.json())
Note for SOCKS5 users: You must install the SOCKS dependency (pip install requests[socks]) before executing:
Python
proxies = {
    'http': 'socks5://username:password@192.168.1.100:1080',
    'https': 'socks5://username:password@192.168.1.100:1080'
}
Selenium/Playwright Configuration
When performing browser automation with Selenium:
Python
from selenium import webdriver
from selenium.webdriver.chrome.options import Options

chrome_options = Options()

# For IP whitelisting
chrome_options.add_argument('--proxy-server=192.168.1.100:8080')

# Note: Selenium does not natively support username/password proxy strings
# in Chrome without building a custom extension wrapper at runtime.
# IP whitelisting is strongly recommended here.

driver = webdriver.Chrome(options=chrome_options)
cURL Command Line
Testing from the terminal is the fastest way to verify a proxy's health:
Bash
# HTTP proxy with authentication
curl -x http://username:password@192.168.1.100:8080 http://ipinfo.io/json

# SOCKS5 proxy
curl --socks5 username:password@192.168.1.100:1080 http://ipinfo.io/json
Automation Tools (Standard Formatting)
Most third-party automation tools provide dedicated proxy input fields. While exact UI varies, follow these general rules:
- Select the correct protocol (HTTP vs SOCKS5).
- Input the string carefully. Common required formats include:IP:PORT:USER:PASSUSER:PASS@IP:PORT
- Always utilize the tool’s built-in "Test Connection" feature before launching a full task runner.
Act 3: Testing and Troubleshooting Connection Issues
How to Test Your Proxy Connection
Method 1: Browser Verification
Route your browser through the proxy and visit an IP verification tool like https://ipinfo.io. Ensure the displayed IP matches your Nodemaven static IP, not your ISP-assigned IP.
Method 2: Command Line Test
Run the cURL command outlined in Act 2. If it returns your proxy IP payload, your terminal environment is successfully routed.
Method 3: Python Diagnostics Script
Use this minimal script to ensure your application code is communicating correctly:
Python
import requests

proxies = {'http': 'http://username:password@192.168.1.100:8080'}
try:
    response = requests.get('http://ipinfo.io/json', proxies=proxies, timeout=10)
    data = response.json()
    print(f"Success! Connected via IP: {data.get('ip')}")
except requests.exceptions.RequestException as e:
    print(f"Connection failed: {e}")
Common Errors and Solutions
Error: "Proxy Authentication Required" (407)
- Cause: You are receiving a standard 407 Proxy Authentication Required response from the proxy server because credentials are missing, malformed, or invalid.
- Solution: Double-check your dashboard credentials. Ensure your string is formatted strictly as username:password@IP:PORT with no trailing spaces or URL-encoded special characters causing parse breaks.
Error: "Connection Timeout"
- Cause: The proxy port is blocked by your local firewall, or the proxy server is temporarily unreachable.
- Solution: Verify the port number matches Nodemaven’s specs. Test alternative common ports (e.g., 8080, 3128) if provided. Ensure your corporate network or VPN isn't blocking outbound traffic on non-standard ports.
Error: "Proxy Connection Failed"
- Cause: The target IP does not exist, or your subscription has expired.
- Solution: Check the Nodemaven status page for infrastructure outages. Run a basic terminal ping (ping 192.168.1.100) to check for basic packet routing.
Advanced Troubleshooting: Protocol Compatibility
If a specific target endpoint isn't loading, check your protocols:
- HTTP/HTTPS: Handles standard web traffic and REST APIs perfectly.
- SOCKS5: Operates at a lower OSI layer. Required for applications needing UDP support, persistent TCP sockets, or non-web traffic.
- DNS Leaks: Ensure your DNS resolution happens through the proxy. In Python, utilizing socks5h:// instead of socks5:// forces remote DNS resolution, preventing your local ISP from leaking your query intent.
When to Contact Nodemaven Support
Before opening a ticket, ensure you have isolated the issue to the proxy itself (via cURL) rather than your application code. Reach out to support if you experience:
- Confirmed timeouts via terminal cURL despite correct authentication.
- Consistent, severe latency across multiple allocated IPs.
- Dashboard syncing errors (e.g., IPs showing as active but failing basic pings).
- Whitelist configuration failures.
Support response times generally range from 2–12 hours via their ticketing portal.
Best Practices for Long-Term Success
To maintain healthy infrastructure and remain compliant with standard web practices:
- Implement Rate Limiting: Even with a dedicated static IP, hammering a target server with thousands of concurrent requests will result in an IP ban. Implement sensible delays (e.g., time.sleep()) in your loops.
- Respect Target Platforms: Always review a site's Terms of Service. Comply with the IETF RFC 9309 standard for robots.txt to ensure your public data collection is ethical and authorized.
- Secure Your Credentials: Never hardcode proxy passwords in your repository. Use environment variables (os.getenv('PROXY_PASS')) to keep infrastructure secure.
- Monitor IP Health: Build logging into your applications to track response times and 403 Forbidden errors, allowing you to catch degraded proxy performance early.
Frequently Asked Questions
What information do I need for a NodeMaven static proxy?
Use the exact scheme, host, port, username, password, and any location or session fields shown in the current dashboard.
Why do I get HTTP 407?
The proxy did not accept the authentication context. Verify credentials, encoding, allowlisting, and the authentication mode.
Why does cURL work but my browser fails?
The browser may use a different proxy scheme, credential flow, DNS path, extension, or policy. Compare the effective configuration.
Should a static proxy always return the same IP?
Follow the product's documented allocation and replacement policy. Record repeated checks and contact support if observed behavior differs.
Can I disable certificate checks?
No. Diagnose the proxy scheme and TLS path; disabling verification hides a security failure.
Why was the old video removed?
It covered a different dynamic-proxy comparison rather than this NodeMaven static setup, and no verified on-topic replacement was found.

推荐文章
Google账号被停用怎么办?8类官方提示拆解与应对方法
详解 Google 账号8类官方停用提示,拆解平台风控判定机制,结合多账号运营场景,提供环境优化及合规使用解决办法。
查看详情
WhatsApp账号养成指南:从新号到稳定使用全流程
拆解 2026 年 WhatsApp 底层风控逻辑,分享保姆级 21 天分阶段养号 SOP,规范行为与网络环境,大幅降低账号限制、封禁风险。
查看详情
X(Twitter)新手养号教程:从0到高权重账号稳定运营
本文详解2026年注册、冷启动、稳定期全流程,以及六大实用技巧,帮助运营者规避限流与封号风险,实现高权重账号自然增长。
查看详情
Talkatone收不到验证码?2026常见原因与解决指南
系统拆解Talkatone验证码接收失败的常见原因,从号码类型、网络环境到设备设置提供对应解决思路,帮助提升验证成功率。
查看详情
免费获取美国号码指南:Talkatone注册与保号全流程
系统讲解如何通过Talkatone获取美国号码,并从注册环境、使用习惯与保号策略三方面,提升号码稳定性与长期可用性。
查看详情